


The post-launch content for Call of Duty: Black Ops Cold War is in full swing.
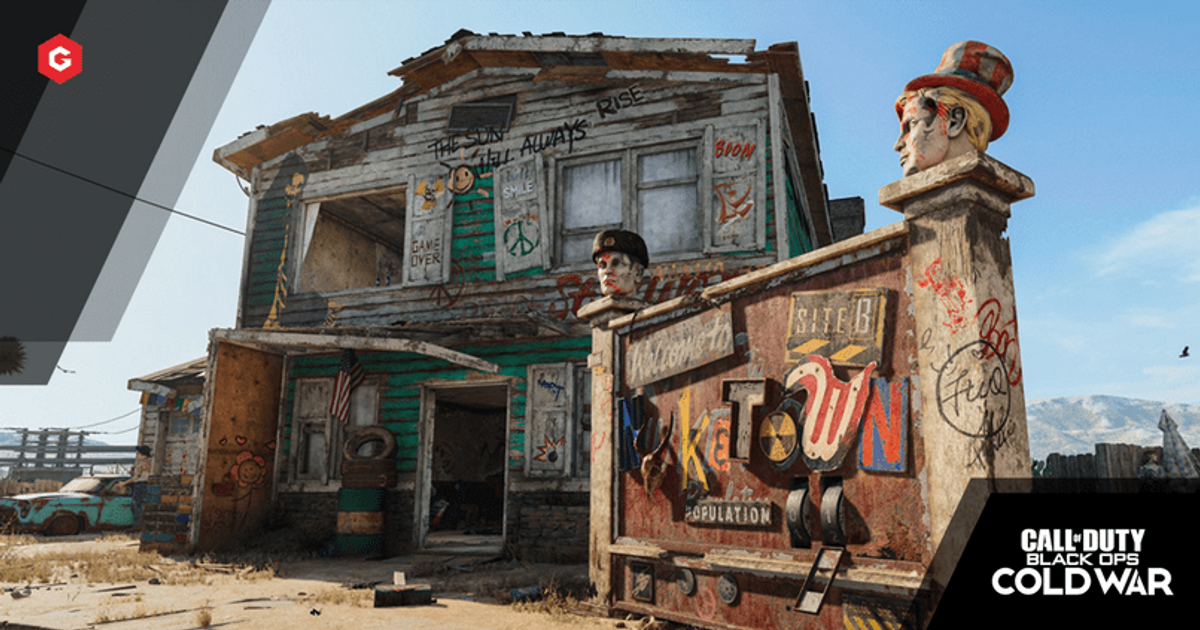
The first piece of content to arrive is the return of iconic Black Ops multiplayer map Nuketown. The map hasn’t been seen since it last appeared back in Black Ops 4.
The map has been given a fresh coat of 80s themed paint to reflect the setting of the game and it looks amazing. The layout itself hasn’t changed, much to the delight of players and fans who have come to love the fast pace and all-out chaos that often takes place during a match.
In this guide, find everything you need to know about Nuketown ’84 including objective locations, key hotspots, the best weapons to use and which styles of play you should adopt in order to score the win.
Read More: Nuketown 1984 Mannequin Easter Egg Guide
Nuketown 84 Map Overview


Objective Locations
Domination

Hardpoint

Control

Search & Destroy

Read More: Black Ops Cold War: Christmas Nuketown 1984 Coming In Season 1?
Key Hotspots
Houses

The houses that overlook the central area of the map are two areas of the map where players constantly attempt to gain control.
The windows on the upper floor provide perfect vantage points for those wanting to pick off enemies from a distance.
When looking out of the window, be aware of the stairs and the entrance to the rear of the house as it is very easy for an opponent to sneak up and take you out from behind you.
The Car

The abandoned car situated next to the truck in the middle of the map is one of the few pieces of cover that can be utilised effectively.
If you’ve managed to evade the gunfire and have made it to the car, crouch behind it to stay hidden from those inside the house and locking down the alleyways.
If you fancy your chances at making a play worthy of the highlight reel, this is the place to do so. Dart in and out of cover quickly to pick off enemies before they even have a chance to react to where you’re located.
The Fence

Found just next to an alleyway next to the yellow house, the fence is an area of the map where you can easily catch many opponents off-guard.
Sit close to the fence to create the perfect ambush or sit closer to the green barrel to set up an off-angle if the opposition are expecting you to be sticking to the fence.
If you plan on being in this area for a prolonged period of time, make sure you don’t run out of ammo by selecting an extended magazine for your weapon or equip Scavenger as a Perk to replenish ammo from fallen opponents.
Read More: Call of Duty: Black Ops Cold War: The 5 Best Multiplayer Loadouts
Best Weapons
After a handful of matches on Nuketown ’84 using a wide range of weaponry, we recommend using these four weapons to conquer the opposition:
How To Play
A Passive Approach
For those that don’t like the idea of rushing into the middle of the map to be eliminated almost instantly, the passive approach is certainly the way to go.
Utilise the alleyways on either side of the houses to pick people off from a distance rather than running head-first into the action.
This particular strategy is great for scoring longshots which are required to unlock the Geometric camos.
Speed, Speed, and More Speed
If the thought of being patient and picking off enemies from afar doesn’t float your boat, this tactic might appeal to you.
Aggression can often lead to scoring plenty of kills, especially on Nuketown ’84. Equip a mobile SMG with attachments which increase the sprint to fire time and aim down sight speed and rush straight into the action!
If you manage to make it past the middle of the map and into the house on the opposite side, be aware of where the enemy team are spawning. Spawns can easily be flipped which means you could easily find yourself hiding from every single member of the enemy team.
The Halfway Line
This strategy involves posting up in the middle of the map and preventing any opponents from making their way across to the other side of the map.
It can be a risky tactic due to the sheer number of angles that can be seen from the middle of the map. If you select a weapon with a strong combination of attachments, you can easily snap onto to targets in quick succession.
Explore new topics and discover content that's right for you!